Handle / Closure Options:
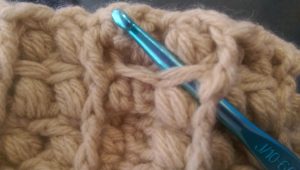
If you want to make a button flap closure as shown in the tan bag in the picture above, after finishing off bag, join yarn into the last fpdc in the final round just before the first fpdc at original join area, (if you completed the ladder step round above, your join for a flap closure should be more secure by joining in, like the example in the picture below) ch 2, hdc around that joined fpdc, work 1 more hdc into that 1st chain in the ladder step (the section that the hook in the picture is also going through), hdc into 2nd chain of ladder step just before the next fpdc, then hdc around that next fpdc as you did in the join. (If you want a longer flap closure, continue across at join area to your desired width before the next step.)
-Ch 2, turn, work a row of hdc into ea st across the flap you are creating.
-Ch 2, turn, work a row of hdc into ea st across
REPEAT until your flap closure is long enough to reach to other side of bag and close at your button area.
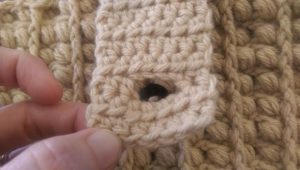
For button hole row, in last row of above repeat, work hdc in ea st across until you reach the middle 2 or 3 stitches in that row, ch either 2 or 3, or however many stitches you need to skip to fit the button you chose, then make sure you skip the amount of stitches you chained for, then continue making your hdcs in ea stitch to complete the row.
-ch 2, work a complete row of hdc across in ea st including chains made for the button hole.
-Repeat for as many rows as you wish to have on top of button hole.
BASKET PATTERN
You will create your basket in the same fashion as the Tuscany Bag, following the exact pattern only stopping at your desired basket size.
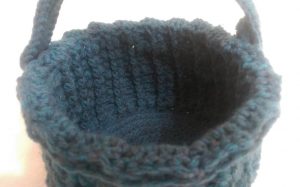
To create the pie pinch top for your basket, you will work the following after completing the height for your basket and joining at the end of your last round:
-Ch 2, fpdc around same fpdc just below chain, fpdc across to next fpdc, sc in top of that same fpdc stitch, fpdc again down into the same fpdc you just worked before sc. (That will be a total of 3 stitches worked on that 1 fpdc, (1 fpdc, 1 sc, 1 fpdc). *Work another fpdc directly around the very nxt fpdc, sc into top of that same fpdc, work another fpdc around that same fpdc*, repeat ** around to end, working those same 3 stitches into ea fpdc around the basket. Join at end of that round to first chain area. (Video will be completed soon for the pie pinch step)
From here you can work a basic handle for your basket by creating a chain as long as you would like for the handle to be, then working 2 – 3 rows of dc, there are several options for handle you can customize it for your liking. You can wind a ribbon around the outer ledge you created that crosses from fpdc to fpdc, let your creative mind take over here!
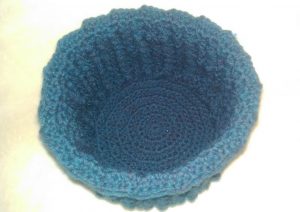
If you are simply using as a decorative basket, you can eliminate the handle altogether, it sits very nicely after creating the pie crust pinch top!
I hope you enjoyed this pattern with very few struggles =). I have personally worked the pattern 3 times myself to double/triple check, however, sometimes the same eyes can overlook something. There is also a full video tutorial created for the bag, minus any closures or additions, to help eliminate any questions about some of the more difficult areas to state in the written pattern, but hopefully, I was clear enough for you to get through the written pattern. I am available at the following if you need additional help:
This pattern is being offered free to the public for creation purposes.
Selling this pattern is strictly prohibited, altering or modifying this pattern for distribution purposes is strictly prohibited, this does not mean you cannot change the pattern for your own personal use! You may not change the pattern to distribute or share it as your own in your community or any other venue. Whatever you choose to do with your end product is your choice. There was a lot of time and effort that went into creating this pattern to make available free to the public. If you plan on offering this pattern to your group, members or friends please refer to the link to YarnWars.com with the following: http://www.yarnwars.com.
Also note: If you have any problems or questions with any area of this pattern, please feel free to join in the discussion at our YarnWars Group Page at http://www.facebook.com/groups/yarnwars. We would love to see you there and we would LOVE for you to share your final creations with the community!
Sim looking for your hat patterns, the one that has the front post around the dc
Oh I’m not sure Cathrin! I’m so sorry… I believe I have several patterns that include front post… can you give me a little more detail on what you were looking to make?
I’m sorry Cathrin… I missed the “hat” in that comment… lol… could it be the Stormy Waters pattern? http://www.yarnwars.com/stormy-waters-hat-pattern/
Looks very good for a bag that is solid and unlike many more fragile patterns that would only take light use. Please tell me what the sizes are for this bag as there was no basic finished sizes or stitch gauges to show what can be expected.
Hi Jean! Yes, the Tuscany bag is quite solid with a very nice texture… The size on both the cream and blue bags I mention in the pattern is 10″ tall. I want to say they were approximately 8″ wide.