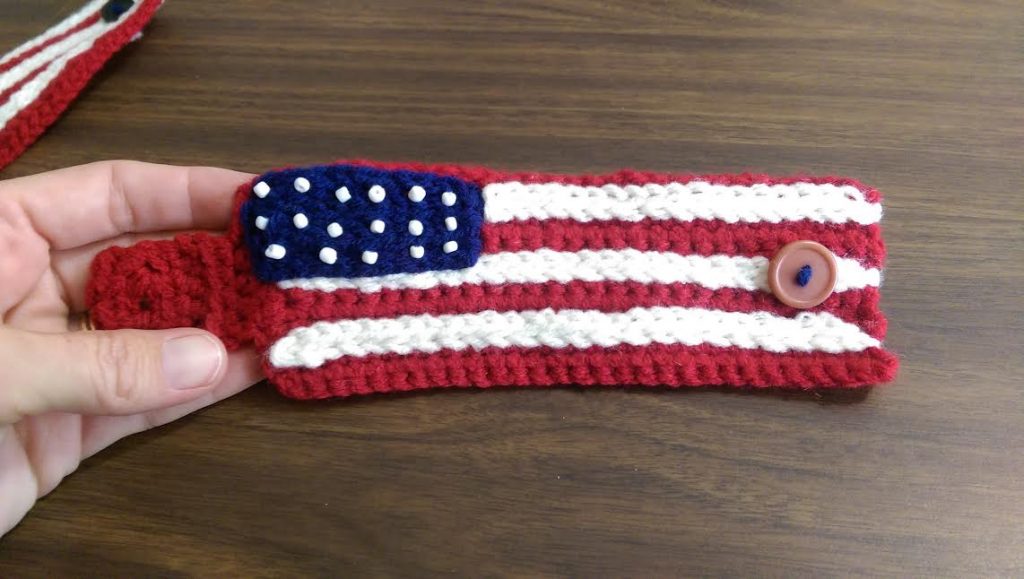
Pattern for Cuff Bracelet (Larger):
Click Here for Video Tutorial on Cuff Bracelet
Starting with Red for the base of bracelet,
Chain 18 – 24 (Child) Chain 28 – 32 (Adult)
(Leave approximately 6” tail)
(Starting chain range will vary depending on size of wrist. Measure around wrist for proper fit. Ends of bracelet should just meet, not overlap.)
- Sc into 2nd chain from hook and every chain after to the end.
- Ch 1, turn, work sc into 1st st and every stitch after to the end.
- – 8. Repeat row 2 for a total of 8 rows, not including starting chain.
When you reach the end of your 8th row (not including your starting chain), continue on:
This next section of the pattern is the closing tab for the cuff.
- Ch 1, working down along the side of cuff, sc into ea of the 8 stitches. Slip stitch into last starting chain space.
- Ch 1, turn. Slip stitch into 1st 2 st, then ch 1 work 1 hdc into each of the next 4 stitches.
- Ch 1, turn. 1 hdc into each of the 4 hdc worked from previous row.
- Ch 1, turn. 1 hdc into each of the 4 hdc.
- Ch 1, turn. 1 hdc into the 1st st, chain 1, skip next at, 1 hdc into each of the last 2 hdcs. (This row creates the button hole with the chain 1.)
- Ch 1, turn. 1 hdc into the 4 hdcs from previous row. Finish off.
This next section of the pattern begins the straight stitch to create the flag. I suggest you follow the link to view in video if you are not clear on this. It is more difficult to explain in words, but I shall do the best I can. =)
15. With your blue yarn begin at top left corner of cuff, on the side your closing tab is on. Refer to picture below:

Work your straight stitch for approximately 10-12 stitches across the top. Turn and continue working the straight stitch back and forth until you have completed several rows of the blue star section of flag (to your desired size)
Finish off with the blue.
(NOTE: If you see areas of red, you have not worked close enough alongside the previous row of blue worked. You can leave a longer tail in the end to weave in and close up those areas, or you can work more straight stitches into the problem areas.)
With your white yarn, start at opposite top right side of the blue section, working the straight stitch across top of cuff until you share final stitch with the start of the blue.
Turn and work back down the other side along edge of and into same stitches as previous white stitches.
Skip down 2 rows. With white yarn again, start at right side of cuff working until you reach the blue, stitch your last stitch of 1st row of the white into the same as start of blue.
Finish off.
With white yarn, start just below and alongside blue with straight stitch, beginning on left end,,continuing all the way down alongside 1st row of white.
Finish off.
Repeat once more, skipping down 2 more rows, with the white yarn.
Work your final 2 rows of straight stitches and finish off.
Button Placement:
Fold your cuff around to meet end to end. Wrap closure tab over top of cuff to determine where to place your button.
Sew button in place.
Work your stars into the blue rectangle area, however you choose.
I used white beads in the sample picture above. You can use white yarn and create small dots or sequence or other.
The cuff bracelet pattern was a bit difficult to write. My suggestion is if you have access, watch the video for the basics in each of the sections to at least get you started. It is much easier to understand. Video link is above.
This pattern is being offered free to the public for creation purposes.
Selling this pattern is strictly prohibited, altering or modifying this pattern for distribution purposes is strictly prohibited, this does not mean you cannot change the pattern for your own personal use! You may not change the pattern to distribute or share it as your own in your community or any other venue. Whatever you choose to do with your end product is your choice. There was a lot of time and effort that went into creating this pattern to make available free to the public. If you plan on sharing this pattern with your group, members or friends please refer to the link to YarnWars.com with the following: http://www.yarnwars.com, Colleen Hays as the original designer of this pattern.
Please join us! If you are looking for a fun community and making new friends from around the world, picking up free patterns, getting support… we would love to see you on Facebook!
Visit us and join in on some great conversation at YarnWars on Facebook!
Thank you so much for your interest in my pattern!
