To make the stance (as seen in picture at top of page) I simply bent the Grinch’s arms at the halfway point, then tacked the hand in the middle of the hand to the body with yarn and needle. You can leave them straight as well if you wish. I just bent the knees for his photo shoot, those too can be left straight if you wish. =)
Eyes (Make 2) (Switch to D hook) (Using yellow yarn)
- CH 5, sc into 2nd ch from hook & then the 3rd and 4th chain as well. Work 4 HDC into last chain which will bring you around to the other side of the foundation ch. (See diagram below.)
- SC into next 3 ch, slip st into beginning st.
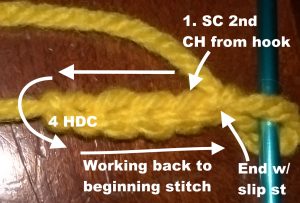
Finish off leaving long enough tail to attach eye to face. With black yarn and blunt needle, stitch a horseshoe or U shape into eye as shown in picture, or a simple round if you like. After sewing the eye on the body, take a small piece of black yarn, maybe 2” and pull it through the outer corner of the eyes at the ½ way mark of your yarn. Secure with a knot & unravel it to make lashes Cut off excess.
Neck Piece (Green & small amount of Black yarn) (G hook)
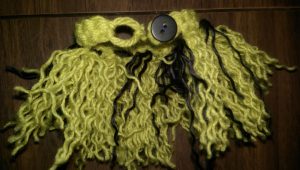
Note: The reason this is made detachable is if it possibly ends up in a toddlers hands. The neck piece is unraveled yarn secured to a crocheted band. (See image 3 below)
- CH 20-25, long enough to wrap around neck and attach button to one side of band.
- SC in 2nd ch from hook and every ch following.
- In last chain, work your sc, then follow that with a slip stitch in same chain, leave small tail.
You will take the starting tail and the end tail and knot them together as the loop for your button, cut off any excess yarn. (See image 1 below)
- Leaving room for a button, take a long strand of yarn, you can work maybe 25” at a time until finished to make it easier.
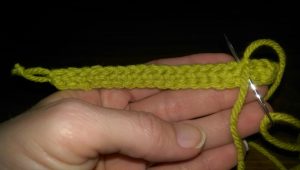
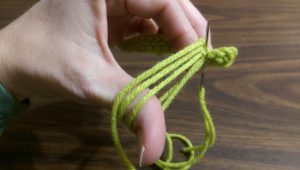
- Thread your needle with the green yarn, and using your thumb as a guide, loop your, maybe 3” – 3 loop clusters into every other top stitch on neck band. (See image 2 below) (Video available for looping & tassle part of neckband).
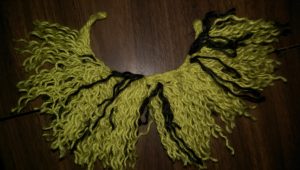
- After each 3 loop cluster, cut one piece of black yarn the same length as loop and tie it into that cluster with the green. Wrap your green yarn around the base of the cluster & secure it to somewhat separate your clusters. (This is all shown in video.) (See finished neckband photo #3 below)
- After completing all of your clusters, across the top of the band, you will start unraveling each strand of yarn. (Might be a good project for movie time! Ugh.)
Best method to unravel yarn without fraying!! Take a strand of the yarn, twist it until all of the fine strands are straight, not spiraled. Take your blunt needle and start separating the fine strands. Yes, it is long, boring and annoying! (Also shown in video above =))
From this point, the only thing left to do is your face! You will just use the black yarn to stitch on your nose, eyebrows & mouth.
You are finished!
Would love to see your finished Grinch doll at http://www.facebook.com/groups/yarnwars
If you have any questions or need any help with this project, please stop by the above link and join the discussion!
We have an amazing group of people at YarnWars, everyone is very helpful and kind. We’d love to see you there!
Learn different crochet techniques along with other complete walkthrough video tutorials at Chaysie Crochet on YouTube!
Thank you so much for your interest in my pattern!
Always more to come!
🧶♥️ THANK YOU!!
You’re welcome ♥
I’m having a great time making this Grinch doll. I found the perfect item to make the limbs posable – I stuffed hair curlers inside- they are even green!
Love this! ♥
Would love to make this but the whole pattern is not here. And it is not at the bottom of the page.
Wonderful pattern. My granddaughter is a Grinch fanatic. I made this for her birthday.
Thank you so much. The only change I made were the hands. I didn’t think a 4 year old would understand the tufts of fur.
Thanks again.
Do you have a pattern for Cindy Lou Who
by chance?
I don’t see the directions for arms and legs either. It goes from head to comments with no page 2.
Hi Connie, if you scroll to just the bottom of where the pattern is on page one, you will see, I believe, 3 more pages for you to click on =)
Yes they are there. I didn’t see at first, but says Previous, 1,2,3 and Next.
Blue boxes
I can’t find them. Please make sure they are there.
Hi Donette, you will need to click on each new page where the pattern ends. There are 3-4 pages for this pattern.
I cant find it anywhere …
http://www.yarnwars.com/free-patterns-created-yarnwars/free-mr-grinch-inspired-doll-crochet-pattern/ =)
Found the pattern to be very good and easy to follow. Came out looking as pictured and happy with it. Thank you.
So glad you enjoyed it Cheryl! Thank you for your comment! ♥
Thank you so much for offering this free pattern who just love the Grinch!
My pleasure Diane! I hope you enjoy! =)
Why am I just now coming across this pattern. I love it and started on it right away. My 11 year old loves the grinch. Thank you so much for the pattern and video.
Thank you so much Tia! So happy to hear. Really appreciate your comment ♥
I have not been able to locate the rest of the pattern past the body… I don’t have anything past page 1. I need the pattern for the arms. I can try watching the you tube video. Thanks!
Hello! I’m sorry I am just getting back with you on this. There are page numbers lower down in the page to take you to another page. It should be not far above the comment section on the page. You can also download the pdf file located in the YarnWars Facebook group at: http://www.facebook.com/groups/yarnwars. =)
Thank you for the free pattern. Kind a d caring people like yourself makes this hobby great.
Thank you Randy, that means a lot ♥
Hi there!
THANK you so much for the pattern!!
What color green did you use?
I believe I used an old, no longer available RedHeart.. I think it was avacado, but there are so many better greens out there! You can go with an even brighter green and get so much closer to the Grinch than I did ♥ Thank you!!
I wish there were Grinch KNITTING Patterns.
I know… I’m so sorry Cindy! If I were a better knitter, I would make a pattern for one just for you! =)
I have tried and tried to find this grinch… I’ve looked on said files. It isn’t there !” help
Hi Eva! The Grinch is both on the YarnWars website, (you can do a search for Grinch) or in the YarnWars group Files tab. Make sure you are actually in the group, http://www.facebook.com/groups/yarnwars . There are a couple of pages and it is an older pattern so you might have to click to show more. Thank you!
Hi, how much red heart super saver green yarn do you need ?
Hi there! I want to say I only used one skein if that. I hope I’m correct on that. It has been a bit since I wrote that pattern and I know I should have mentioned it before, it was one of my newbie patterns 😉 ♥
How much green yarn is needed for the grinch
I can’t find the full off pattern
Hi Linda! Full pattern is there, just multiple pages, you just need to scroll a bit down to see the page numbers. If you would like the free pdf pattern for the Grinch (without having to turn pages ;)), visit us at http://www.facebook.com/groups/yarnwars. All of YarnWars patterns are available in pdf downloadable/printable format in the group’s Files tab =)
Do you know how hard it is to get a GRINCH Knitting Pattern….
Hi Carole! I’m sorry, I don’t know… All of my patterns to date are crochet. I’m not sure to be honest if there is a Grinch knitting pattern out there… Wish I could help with this.. I would! =)
Cannot find the rest of the pattern
Hi Zeta! Please note the numbered pages at the bottom of each page. There are a few pages for the Grinch. You can download and print a pdf of this pattern in our Facebook group at: http://www.facebook.com/groups/yarnwars Thanks!
Anyone have an issue with his neck being floppy? He is turning out so cute but after messing around with the doll so much , his neck is not supportive at all and I am trying to figure out a way to semi fix this on a doll that’s completed. The next one I plan to put rolled canvas in the neck I think
Hi Hope! I address his floppy neck in the video 😉
Do you make the single crochet base for the hair as well or just make the tassels on the head?
Just the tassels =)
Could you send me a email of the pattern so I can download it too? Thank you for this awesome pattern! Cynkris2002@yahoo.com
I love the grinch! Thank you for the pattern. I am making mine using size 10 thread. Can’t wait till its done!
Awesome Beth! Would love to see him when you finish! ????
I love your grinch pattern. I’ve made one and now have to make one for all three of my daughter’s.
Hahaha! Thanks so much Karen! I’m sorry for the extra workload lol… but so happy you love it! =D ♥
I am Getting ready to make one. I will be making it smaller to go with my Elf on the shelf. Thank you so much.
Oh how fun! I hope it turned out awesome! Happy New Year! =D
Can you send me a email of the pattern so i can download it
Sent =)
Thank you for this adorable pattern, my eldest son (47) loves the Grinch!!
You’re so welcome! Thanks so much for your interest in my pattern Gramz! ????
Your arms and legs are 5″ you say about 24 rows slot of us will use 24 then you start the hands and feet at 27 why not at 25
It may be a misprint Debby.. when I get back on my computer I will check and adjust if needed. Thanks so much for bringing that to my attention! ????
Help! I love your pattern but I can’t find page two, with the legs and arms anywhere. Please help I want to make this for this Christmas. Thank you so much.
Never mind, finally found it. Thank you .
=)
I know you stated that you found it in your follow up, but for those struggling to find the next sections, there should be numbers just below where the pattern on a page ends indicating next page =) Thanks for your kind feedback Peggy!
This pattern is adorable! Thank you! I can’t wait to make it
Thanks so much Gloria! I love Mr. Grinch and I’m about to start on my 4th =)
I don’t understand how to make the hair, fingers and toes. Can you help me?
Hi Candace! I have a full video tutorial for this project.. if you skip to approximately 34 minutes in the video located here: https://youtu.be/Es6vUS0LMaA you will see how I do the hands and feet. The hair is the same fashion only with less yarn which should be towards the end of the video I believe. Have a great day!
Grinch – is row 4 of the body sc or hdc? Curious since all other stitches in body are hdc.
Thanks
Sandy
Thank you for pointing that out Sandy! Yes, that should be hdc ???? I’ll get in and change that now. Thanks so much and have a wonderful day!
where is the pattern for the arms, legs and feet? am i missing somethiing? i am new to patterns but i can not find them
Keresa, the pattern is all there, it could be that you need to click on a different page for it. The pattern is not all on one page as it was pretty long. Thanks!
Thank you. I will try.