Easter Jelly Bean Pursket & Egg Hunt Bag
– Free downloadable pdf in our group on Facebook –
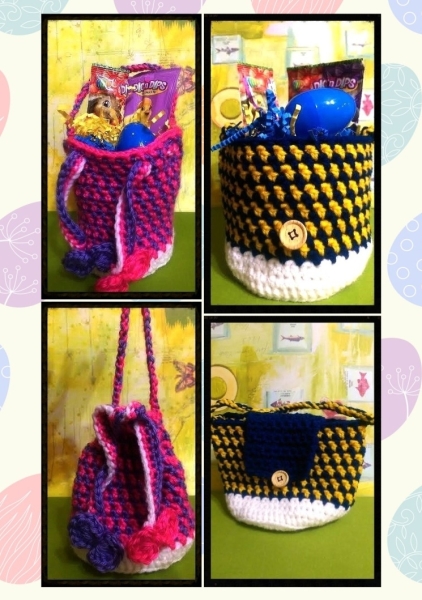
This fun little Purse/Basket is the perfect accessory for your little girl’s Easter holiday dress or for any spring occasion! This is made to act as a little basket which is perfect for that Easter egg hunt, or to simply be used to sugar up the holidays, and it is also made with a little pull ribbon to hold tight those special little treats & little girly things! Fill it with Easter grass, candy and little toys/gifts, your little pursket will stand tall and proud!
My daughter is now 20 & I wish that I was a crocheter back in her baby days.. I would have been one of those moms =), so in a way, I guess that I am making up for those yarnless years.
Of course, you MUST have a little Jelly bean, egg hunter bag for that little man in your life!
The little boy version of this bag is just as fun and you can pack it, stack it full of yummies and then use it for that big Easter egg hunt!
Alternatively, if you don’t have a little boy or girl to make these for, you can do what my initial creation was meant for, and simply create several of these adorable baskets, big and small and set them around the table filled with little goodies for that special Holiday. As I mentioned, if you fill them with some Easter grass, they hold pretty sturdy.
What made me decide to make this basket pattern? After my siblings and I had grown and moved out of my parents home, each year, my mom would hold a little Easter brunch & egg hunt for everyone. We would go to her house and her table would be decorated with little baskets, big baskets, filled with treats to snack on.
I haven’t been able to go home for Easter for some time now, but this inspired my project along with my LOVE for jelly beans & I really hope you enjoy it!
You can add your own little twist on this of course! You can make a shorter or taller basket by eliminating or adding some rows, you can keep or remove the little pull or fold over closure and make it a stand alone basket, you can add little appliqués to really snazz it up or you can even go on to YouTube and find one of the many ways people are using to stiffen up their crochet projects and make it an actual solid basket!
I have also included my little bow pattern at the end (also available in video tutorial) which you can turn into little butterflies by adding antennas. So many fun things you can do! This pattern is meant to bring out your inner creative, have fun!
Let’s GO!
![]()
Supplies:
- H hook – 5mm (your hook size will determine size somewhat. If you want a smaller bag, go down a couple of hook sizes. You can also add or eliminate rows for your basket to make it shorter or taller. Want a bigger basket, try an I or J hook)
- Yarn I used for girls pursket:
Red Heart With Love- White
Caron Simply Soft- Neon Pink
Bernat Satin- Lavender - Yarn I used for boys Jelly Bean Egg Hunter Bag:
Red Heart With Love- White
Red Heart With Love Peacock
Red Heart With Love Bright Yellow
You will also need (for boy basket):
- Button
- Stitch marker
- Scissors
- Thread & sewing needle for the button
- Blunt needle for hiding tails
This pattern is actually very similar in a couple of areas to my Oh My Comfy Cozy Pattern. There is a video tutorial on the bottom basket part which is the coaster section of the cozy pattern. The only difference is you will work 2 or more rows, depending on the size you wish to make your basket.
Pattern:
For the bottom of the basket, starting with the white yarn, (or whatever color you are using for the bottom of your basket),work the following:
- Ch2, work 9 hdc into loop (Count your ch2 as your 1st hdc) (10)
- Ch2, 1 hdc into same stitch as ch2, inc by working 2 hdc into ea hdc around. Join to top of ch2 (20)
- Ch2, 1 hdc into same stitch as ch2, [1 hdc in next st, 2 hdc into next st], repeat [ ], join into top of ch2. (30)
- Ch2, 1 hdc into same st as ch2, [1 hdc in ea of next 2 st, 2 hdc into following st], repeat [ ], join into top of ch2. (40)
- Ch2, 1 hdc into same st as ch2, [1 hdc in ea of next 3 st, 2 hdc into following st], repeat [ ], join into top of ch2. (50)
- Ch2, 1 hdc into same st as ch2, [1 hdc in ea of next 4 st, 2 hdc into following st], repeat [ ], join into top of ch2. (60)
(Again, you can continue with rows if you wish to make a bigger pursket! Simply add 1 hdc to each row before each increase. This will increase each new row with 10 additional stitches, example: Row 7 = 70 total stitches, Row 8 = 80 total stitches, etc.)
- Ch2, work 1 hdc into ea blo around, join (60) (This will create a little ledge that will help work your project upward instead of outward! See image)
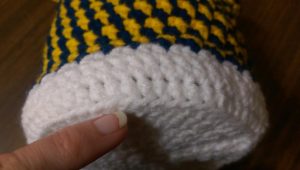
Image for round 7
- Ch2, work 1 hdc into ea st, both loops around, join
- Ch2, work 1 hdc into ea st, both loops around, join
(Rows 7-9 are the bottom lip or sides of the pursket. You can add a couple of extra rows to make sure the little things that get put in the bag, stay put in the bag. This shouldn’t be a problem regardless, the little chain spaces around are very small. For this pattern, I worked 2 rows of the bottom sides for the girls, 3 rows for the bottom sides for the boys.)
We will now work into the basket/purse section alternating whatever colors you choose, do not detach your yarn throughout if you are alternating only 2 colors; it will save you a lot of tail hiding =))
OR!
Think of your little hdc’s as jelly beans and get color crazy! (That might require a little more tail work.)
I make sweater sets for the local hospital’s newborns and that bunny would be a perfect applique. Now, to find the pattern.
http://www.yarnwars.com/5-minute-bunny-applique-pattern/
I’m so sorry Kathryn! I had the pattern up in the menu “Free Patterns” on YarnWars so I hope you were able to find it. I had originally linked the image on the page but for some reason, it’s not working. My apologies and if you ever struggle to find one of my patterns, the search function should take you right there. Thanks so much for the heads up!! =)