
 Pattern Design by Colleen Hays with YarnWars.com
Pattern Terms:
This pattern is being offered free to the public for creation purposes. Selling this pattern is strictly prohibited, altering or modifying this pattern for distribution purposes is strictly prohibited. This does not mean you cannot change the pattern for your own personal use! You may not change the pattern to distribute or share it as your own in your community, website or any other venue. Whatever you choose to do with your end product is your choice. There was a lot of time and effort that went into creating this pattern to make available free to the public. If you plan on sharing this pattern with your group, members or friends, please refer to the original designer of this pattern Colleen Hays with YarnWars.com the original designer of this pattern. Thank you so much!
![]()
Supplies needed:
–H, F & D hook (H for body, F for arms, D for hands & Eyes)
-Yarn – Your color choices (I used Bernat Super Value red & black)
-Smaller blunt needle
-Stitch Marker
-Scissors
-Stuffing
(Optional: Buttons or large beads could also be used for eyes.)
![]()
Techniques Used in Pattern:
Sc – Single Crochet– (insert hook into stitch, draw yarn back through, yarn over, draw through both loops on hook)
Hdc – Half Double Crochet– (Yarn over, insert hook into stitch, draw yarn through, yarn over, draw through all 3 loops on hook.)
Dc – Double Crochet (Yarn over, Insert hook into stitch, yarn over, draw yarn through stitch, yarn over pull through 2, yarn over pull through last 2 stitches on hook.)
Sl st – Slip stitch (Insert hook into stitch, yarn over, draw yarn through, continue to draw yarn through both loops on hook.)
Cluster – (Yarn over, insert hook, yarn over, draw yarn through, yarn over again, insert hook into same stitch, yarn over draw yarn through, yarn over and pull through all loops on hook.)
Heart Cluster – (Yarn over, insert hook, yarn over, draw yarn through, yarn over again, insert hook into same stitch, yarn over draw yarn through, yarn over and pull through all loops on hook, chain 1, slip stitch into same stitch. Repeat the cluster once more to slip stitch into that same stitch as first cluster. Finish off with the slip stitch into that same stitch.)
![]()
Pattern:
Pattern is worked in continuous rounds without join or chain up unless otherwise stated.
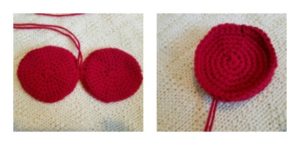
BODY – Grab your H hook! (Make 2)
- Chain 3. Work 8 sc into the 1st chain made. (8)
- Working directly into the 1st sc made from previous round, work 2 sc into each stitch around (16)
- 2 sc into 1st st, 1 sc into next st. *2 sc into next st, 1 sc into following st* Repeat from ** ending round with 1 sc and a total of (24) stitches.
- 2 sc into 1st st, 1 sc into each of the next 2 st. *2 sc into next st, 1 sc into each of the next 2 st* Repeat ** (32)
- 2 sc into 1st st, 1 sc into each of the next 3 st. *2 sc into next st, 1 sc into each of the next 3 st* Repeat ** (40)
- 1 sc into each stitch around. Join to the 1st stitch made from previous round. (40)
- Ch 2, work the following: 1 dc into the 1st 5 stitches beginning with the 1st chain space, 1 hdc into next 5 st, 1 sc in next 9 st, 1 hdc in next 2 st, 1 sc in next 9 st, 1 hdc into next 5 st, 1 dc in last 5 st.
Join at the end of round 7 to 1st dc from previous round leaving approx 8” tail.
(Round 7 may not look like a heart after completion, but it will help create that look in the end.)
Flip both body pieces right side down & tie end tails together securing both body pieces, then flip wrong sides together with tails hanging in between body pieces to bottom of heart. Set aside & proceed to other pattern parts.
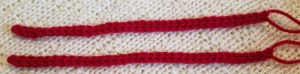
ARMS – Grab your F hook! (Make 2)
- Chain 31, slip stitch in 2nd chain from the hook and every stitch after to end. Leave a 4” tail at end.
HANDS – Grab your D hook! (Make 2)
Left hand:
- Chain 3, work 6 sc into the 1st chain made (6)
- Working directly into 1st sc from previous round, increase into each stitch around (work 2 sc into each stitch) (12)
- 2 sc into 1st stitch, 1 sc in next, *2 sc in next st, 1 sc in next* Repeat ** (18) Join
- Ch 5, slip stitch into the 2nd chain and remaining 3 chains, then sl st to the next stitch on hand.
- Sl st into next st on hand, then ch 5 & repeat round 4.
- Repeat round 5 for a total now of 3 fingers.
- Sl st into next 3 st then ch 6. Sl st into 2nd ch from hook and each ch following to the hand.
- Sl st into next 4 stitches then ch 1 to finish and secure leaving a 4” tail.
Right hand: We will work this the same only beginning with the thumb for round 4.
Row 1 through 3 work same as left hand pattern above.
- Ch 6, sl st into 2nd ch from hook and each ch following to bottom, sl st into next stitch on hand and next 3 st.
- Repeat row 4 from left hand.
- Repeat row 5 from left hand until you have a total of 3 fingers and a thumb on your hand.
- Sl st into next 5 st then ch 1 to finish and secure leaving a 4” tail
Use the beginning tail in ea hand to close any gap in center of hand, then come up with needle to top side of hand to tack the thumb down as seen in image below. It is not necessary to tack the fingers down, they will fold and stay down easily on their own as seen in 2nd photo below.

EYES – D hook! (Make 2)
I am offering 2 different, super simple eye choices, as seen in both photos at the top of the pattern page. So many different options to decorate your heart balloon holder though… Get creative!
1st is the single cluster button eyes:
Ch 2, work 1 cluster into the 1st chain made. (Follow cluster instructions in Technique section above.) When complete, chain 1 to finish and secure. Tie the 2 tails together and pull each strand through to the backside of your heart. Tie with a couple of knots to secure to heart. (There is no need to weave in ends as they will be on inside of heart with stuffing. Repeat for 2nd eye and attach to heart.
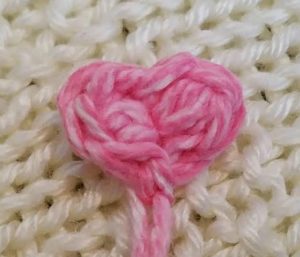
Next are the Heart button eyes: (Make 2)
Ch2, working into the 1st chain created, you will work the Heart Cluster as explained in Techniques in beginning of pattern above to achieve the look in photo below. When complete, pull tails tight to help form the heart shape:
After completing all of your pieces, affix the face. To make the mouth, I just used my blunt needle with some black yarn and sewed it on, but this is an area that you can get creative and make the face of your choice! You can glue on googly eyes, buttons, or choose one of the eye patterns above.
Take the tails from either your arms or your hands and attach each hand to each arm as seen in photo below by taking blunt needle and weaving from 1 piece into other piece just until secure:
Now you will start closing your heart working the other pieces in place as you reach each body part area. Remember to keep your tails from the body on the inside of the heart pieces hanging through the bottom as seen in the photo in heart pattern area.
Beginning from top of heart, insert D hook and join new yarn.
Going into front loop only of 1st st of heart facing you and into back loop of heart piece on opposite side, work a slip stitch and continue in this fashion around the heart bodies making sure to hook/sew your arms in place when you reach the mid area of the side of the heart, continue around. When reaching the bottom of heart, you want to make sure the tails hanging through from top are simply worked around so that they still pull freely but you also want for them to have a stitch in between them so the strands are not completely together. (This will make more sense when forming the heart at the end.) After working a couple of stitches past your 2nd arm, stuff your project:
Continue slip stitching your project closed after stuffed to desired fill.
When you reach the top and finish off, tie the 2 tails at the top of the heart together as seen in 1st photo below:
Gently pull on bottom strings to pull top middle section down, giving you a completed heart form, then knot the 2 strands together. (This is why you wanted to make sure, as mentioned earlier, that there was a stitch in between the 2 strands when closing your hearts).
Hide your 4 tails by threading each one through your needle and going in 1 side of heart, coming out another. Clip off and your tail will now be hidden within the heart. No need to go through serious hiding here. =)
![]()
That is it folks! One of these hearts can be made in less than an hour!
They are so fun and super quick to whip up!
I really hope you have enjoyed this pattern. The pattern is so simple, but sometimes my explanations make it a bit more complicated than it is. Hopefully I didn’t do this here!
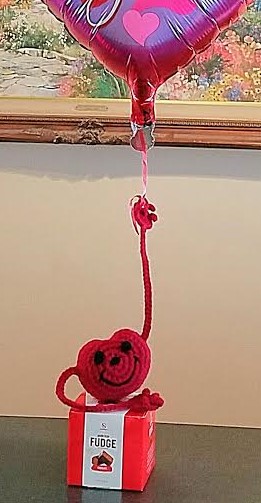
The Balloon buddy is so fun and easy and he will be the perfect addition to your little treat spread for your loved ones. This can be used for any occasion as well… not just Valentine’s Day! (Hint- a fun classroom treat for Valentine’s Day party if you are a teacher, room mom or dad ;))
I would absolutely LOVE to see how you fancied up your balloon buddy! Please do share with me. You can send me an email at yarnwars@gmail.com or share it in the Facebook group OR page!
I hope you will join us in our YarnWars Facebook group where you will meet so many great yarn crafters from around the world, make new friends and maybe even learn a few new tricks! You will also find all of our patterns in downloadable printable pdf format in our groups Files tab, just below the timeline photo.
If you aren’t interested in joining a group but would like to keep up with new free patterns when we announce them… why not LIKE us on our YarnWars Facebook page!
Several of my patterns are also available as video walkthroughs on my YarnWars YouTube channel. This pattern will be available soon as a video tutorial as well so make sure to subscribe to be alerted when a new free pattern tutorial comes out!
Lastly, you will find all of our patterns at YarnWars.com where you are also welcome to subscribe to be the first to know when new free stuff comes about!
Thanks so much for your interest in my pattern!
HAPPY YARN CRAFTING my friends <3
![]()